

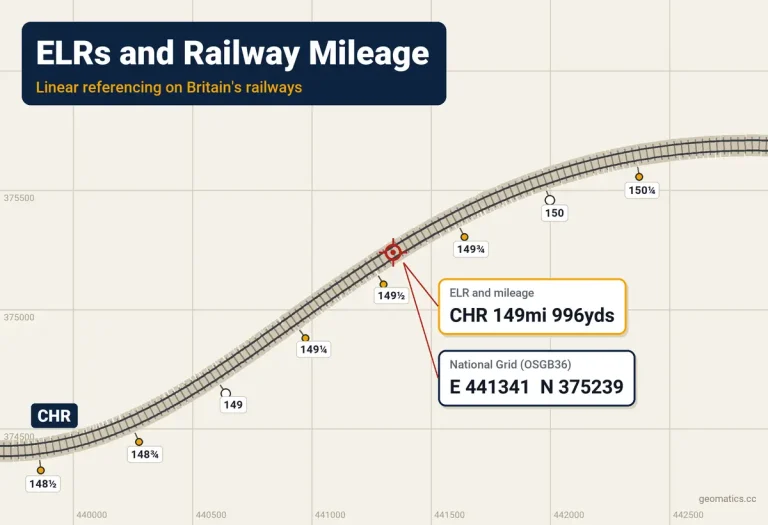
If you survey on the railway in Great Britain, the first thing you notice is that nobody gives you coordinates. A site is “BML1 24 miles 1053 yards”, a defect is “CHR 149m 50ch Down Main”, and the access point is “the gate at 147¾”. Every drawing, possession notice and job sheet speaks in ELRs and mileages, and your survey, in OSGB36 eastings and northings, has to meet them somewhere.
This post explains what that referencing system is, why converting between it and coordinates is less simple than it looks, and how I deal with it on site.
What an ELR is
An Engineer’s Line Reference, or ELR, is a short code for a stretch of line: three letters, or three letters and a number. BML1 is the Bournemouth main line out of Waterloo, ECM1 the East Coast main line out of Kings Cross, and CHR the line from Tapton Jn near Chesterfield up to Masborough Jn at Rotherham. There are around 1,400 with track on them across the network.
The letters usually abbreviate the route’s name, and the number tells sections of a long route apart. ECM1 runs from Kings Cross to Shaftholme Jn, north of Doncaster; ECM2 picks up there and runs to Temple Hirst Jn; ECM3 carries on from Temple Hirst. Each ELR has a start and an end, usually at junctions, and where one ends the next begins.
An ELR on its own is just a line. To say where you are on it, you add a mileage, measured from the ELR’s zero, which is usually at the London end or the end where the line was first built. Together, an ELR and a mileage pin down one place on the network, and no other place has the same pair.
Mileages don’t start at zero
The zero isn’t always on the ELR itself. Many ELRs carry on the mileage of the route they branch from. CHR starts at Tapton Jn at 146 miles 1,298 yards, because it continues the mileage of SPC9, the Midland main line, whose miles are counted from St Pancras. Walk the 15.6 miles of CHR and the posts run from 146¾ up to 162¼, not from 0 to 15.
That’s useful, because a mileage tells you roughly how far you are from London or from the start of the route. But it also means the same number can turn up on several ELRs at once, and that two ELRs meeting at a junction can have quite different mileages there. At Beighton Jn, CHR is at 155 miles 1,126 yards and BEW, the line it meets, is at 48 miles 56 yards. Even where the mileages nearly agree they rarely match exactly: at Barrow Hill North Jn, CHR reads 149 miles 996 yards and BAC2 reads 149 miles 1,005 yards. A mileage without its ELR is meaningless.
Miles, yards and chains
Most of the network is still measured in miles. Mileages are written in miles and yards (1,760 yards to the mile), or in older documents miles and chains (80 chains to the mile, 22 yards each). So 24 miles 48 chains is 24 miles 1,056 yards.
For anything metric you’ll need the conversions, and they’re exact by definition:
| Unit | Yards | Metres |
|---|---|---|
| 1 mile | 1,760 | 1,609.344 |
| ¼ mile (between mileposts) | 440 | 402.336 |
| 1 chain | 22 | 20.1168 |
| 1 yard | 1 | 0.9144 |
To turn miles and chains into miles and yards, multiply the chains by 22. To turn yards into metres, multiply by 0.9144. Working in metres along an ELR, 24 miles 1,056 yards is 24.6 miles, or 39,589.9 m from the zero.
A few lines are metric. HS1 is measured in kilometres, and you’ll meet both on any job that crosses from one to the other.
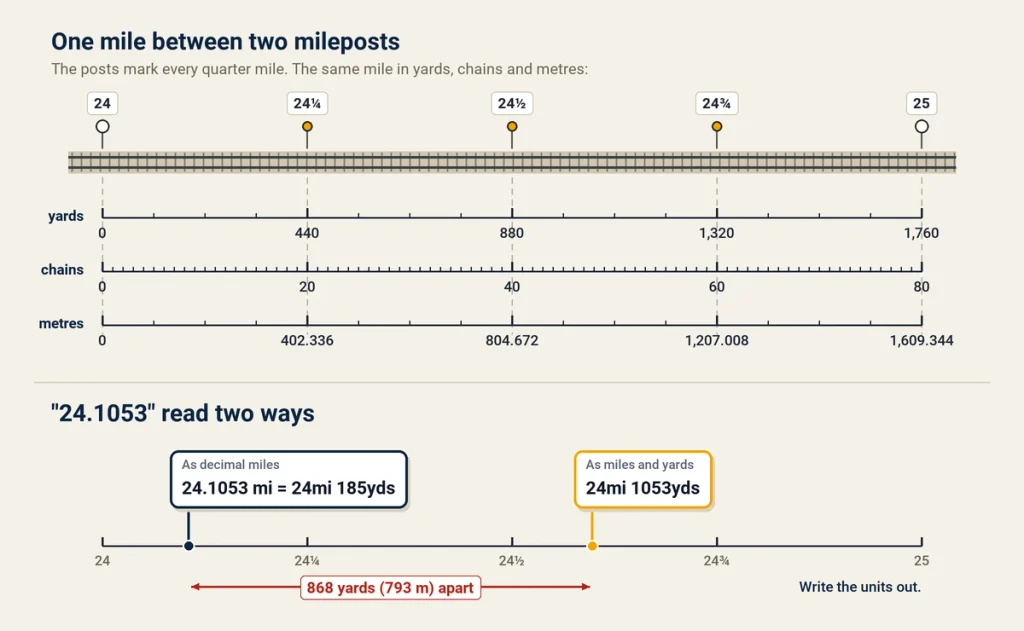
Watch out for how mileages are written down. On a sheet, “24.1053” usually means 24 miles 1,053 yards, but a calculator, a spreadsheet or a GIS will read it as 24.1053 decimal miles, which is about 24 miles 185 yards. That’s 868 yards out, nearly half a mile, and nothing will warn you about it. When I pass a mileage to software, I write the units out: 24mi 1053yds, never 24.1053.
Mileposts
Along the line, mileposts mark every quarter mile: a full post at each mile, then ¼, ½ and ¾. They’re the physical reference everyone on site trusts, and they’re where mileage and the ground actually meet.
They also show the system’s age. Many mileages were set when the lines were built in the 1800s and carried through every realignment since, so a “mile” between two posts isn’t always 1,760 yards on the ground. Lines have been straightened, diverted and joined, leaving long miles, short miles and places where the mileage jumps.
On site, I usually find a milepost first and work from it. If I can’t, a structure plate is the next best thing: bridges and other structures carry plates with the ELR and their structure number.
How a coordinate becomes a mileage
On paper the conversion is simple: find the nearest point on the line’s centreline and measure along it from the zero. In practice, it takes four steps, and each has a trap.
- Get the coordinates onto the right datum. Railway data is in OSGB36 National Grid, while a phone or GNSS receiver gives ETRS89 or WGS84. Converting between them properly needs OSTN15, which I covered in how to convert between coordinate systems in the UK. Using a seven-parameter Helmert transformation instead can put you a few metres out. If your project runs on its own low-distortion grid, read SnakeGrid: the ultimate guide before mixing its coordinates with anything referenced to OSGB36.
- Find the right line. Drop a perpendicular from your point to the nearest track centreline. At junctions, in station throats and where two ELRs run side by side, the nearest line can belong to the wrong ELR. Which track you’re on matters as much as where you are along it.
- Measure along the line. The distance along the centreline from a known point gives you a length, but not yet a mileage.
- Calibrate against the mileposts. Because of all those long and short miles, a length measured along today’s centreline drifts away from the mileage the railway uses. The fix is to tie the two together at the posts on either side and share the difference out in proportion.
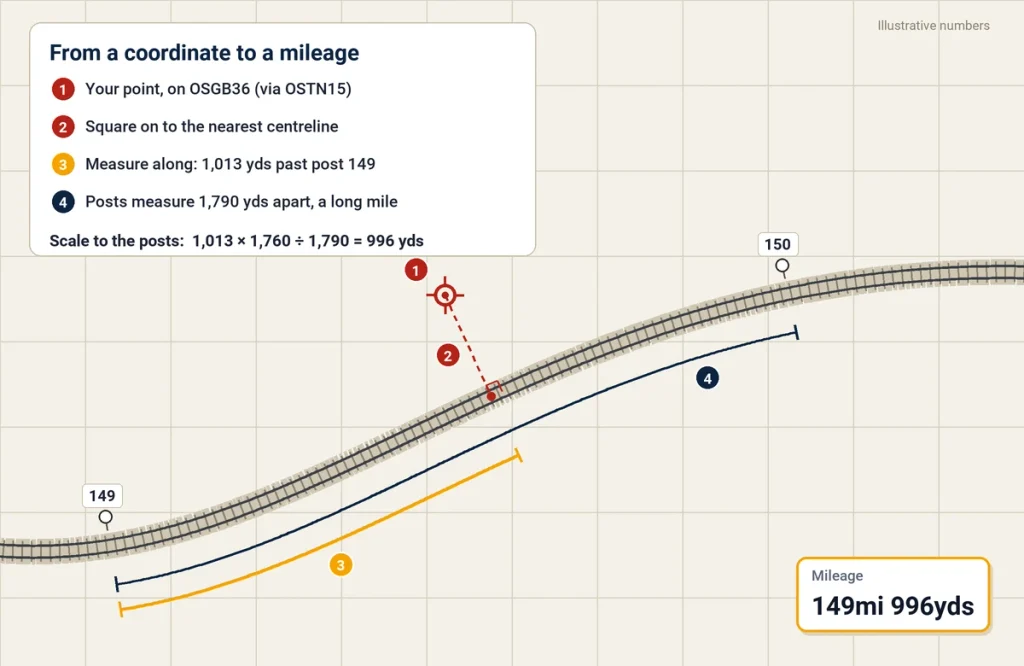
Here’s a worked example. Say the posts at 149 and 150 are 1,790 yards apart along the centreline, a long mile by 30 yards. Your point is 1,013 yards along the centreline from post 149. Scaled to the mile between the posts, that’s 1,013 × 1,760 ÷ 1,790 = 996 yards, so the mileage is 149 miles 996 yards. Leave out the calibration and you’d call it 149 miles 1,013 yards, 17 yards out, and the gap grows the further you are from a post.
A mileage that disagrees with the posts beside it is no use to anyone on site, so the posts always win.
Track IDs
The mileage tells you where along the ELR you are, but on a four-track railway you also need to know which track. Network Rail gives each track a four-digit ID in the Track Model, and the digits mean something:
- The first digit is the direction: 1 for Up, 2 for Down, 3 for bi-directional.
- The second is the type: 1 Main or Fast, 2 Slow, 3 Goods, 4 Single, 5 Loop, and so on up to 9 for sidings.
- The last two are a sequence number, 00 for the first of its kind.
So 1100 is the Up Main or Up Fast, 2100 the Down Main or Down Fast, and 2200 the Down Slow. “Up” is generally towards London, which on most lines is also towards lower mileage.
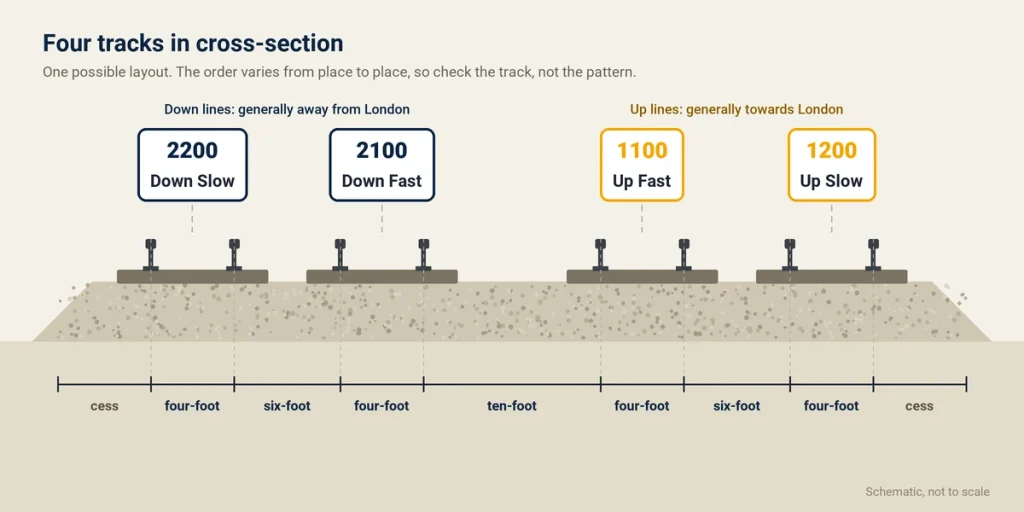
You’ll also hear the spaces between the tracks named. The four-foot is between the two rails of one track. The six-foot is between two neighbouring tracks, and the ten-foot is the wider gap between one pair of tracks and the next. The cess is the strip alongside the outermost track. They’re the words a defect report or a site briefing uses, so they belong in your notes too.
Recording a location so it can be found again
When you’re recording a defect, a survey point or a work limit, write down enough for someone else to find it without you:
- The ELR and the mileage, with units: CHR 149mi 996yds, not 149.996.
- The track: its ID or name, such as 2100 or Down Main.
- Where across the railway: cess, four-foot, six-foot or ten-foot, and which side.
- The nearest milepost or structure: “40 yards past the 149¾ post” or “under bridge 23”.
- The coordinates, with their datum: E 441341 N 375239 on OSGB36.
The track is the part most often left off a field sheet, and the hardest to work out later. My post on survey field books and field notes has more on recording things properly the first time.
Where the information comes from
Network Rail’s own sources come first: the Sectional Appendix for line descriptions and mileages, the Track Model for track geometry and track IDs, and the line diagrams in your job pack. Outside the industry, the Railway Codes website keeps a long-running public list of ELRs with their start and end points, and published track diagrams show the layout, mileages and junction names across the network. Use them to plan and cross-check, and check anything critical against the official sources.
How I work with it now
For years I pieced this together from line diagrams, the Sectional Appendix and a map, and checked it against the nearest milepost on site. That’s still the standard to check against, but it was slow, and slower still with no mobile signal.
There are several apps out there now that give you an ELR and mileage from your phone. I found that LineRef, a rail track locator for the GB network, matches all my needs and has the most features of any of them. On site it gives your ELR, mileage and track from your phone’s GPS, even with no signal. It’s built on Network Rail’s Track Model, with the mileage calibrated so it agrees with the posts: on Network Rail’s data release of 26 October 2026, 99.41% of the 40,984 mileposts checked across the network were within 5 yards of LineRef’s mileage.
In the office, every ELR has its own page with its stations and junctions in mileage order and the other ELRs it meets, which is where the CHR, BEW and BAC2 mileages above come from. The LineRef web map takes an ELR, a mileage, a milepost, a station or a grid reference in one search box. If you’re new to all this, start with LineRef’s guide to finding an ELR, a mileage or a milepost.
A word on safety
None of this replaces the railway’s own controls. A phone’s GPS is good to a few metres in the open, and worse in cuttings, under bridges and between buildings. Never use an app, LineRef included, to identify the line you’re protecting or working on. Check every location against your safe system of work and the approved sources, and only ever from a position of safety.
Used like that, ELR and mileage stop being a foreign language. They’re just another coordinate system, one-dimensional, older than the National Grid and full of history.