Converting to and from SnakeGrid coordinates might seem a like a difficult task when you’ve never done it, but it’s actually quite a simple procedure. In this article I will explain how to do different conversions to and from SnakeGrid coordinates.
If you are interested in a further explanation of SnakeGrid and the concept behind it, you can read my other article SnakeGrid – The Ultimate Guide.
Prerequisites
In order to follow up on this tutorial you’ll need the following ready:
- SnakeGrid PointWise (version 4.1.2 at the moment of publishing this article) – To download it from here.
- A SnakeGrid parameter file – I will be using the MOLEUX11 SnakeGrid (Manchester to Euxton Junction). I cannot provide this file as I do not own it, but this should be provided to you by owner (usually the client).
- A set of coordinates – These are coordinates that should be within 10km of the grid defined in your parameter file (previous point). The coordinate system must be one supported by the software (WGS84, OSBG36, London Survey Grid etc).
Introduction
With the above prerequisites in place, now we should be good to go. Open the PointWise software on your computer once it’s installed in order to get started.
License agreement
Upon opening the software you will be presented with the license terms which you have to agree by in order to run it. This license agreement is presented every time you open the software. Hopefully a future version of the software will remember this on the first run.

Tick the I HAVE READ AND UNDERSTOOD THE TERMS AND CONDITIONS (assuming you agree), then click Accept to start the software.
Interface explanation
The program is simple and only contains one screen, excluding the previous License Agreement Screen. In the screenshot below you can see different sections highlighted. I will explain these individually.

(1) Program title bar
Whilst this seems to be just a title bar with the software name in it, that’s actually not the whole story. Whenever you load a parameter file, the title bar will change to reflect the SnakeGrid defined by that parameter file. See example below of how it looks after I load in the MOLEUX11 Parameter file.

(2) Open SnakeGrid Parameter File
In this area (also called Application Management Area) there are 4 different buttons and they should all be self explanatory. The one we are interested in is the top-left one labelled Open SnakeGrid Parameter File. Once this button is pressed, we will be presented with a File Selection window in which we need to select the desired parameter file.
Note that once a parameter file is selected it’s not possible to change it without restarting the program. According to the official documentation, this is done to prevent accidental re-loading of a different parameter file during subsequent use of it.
You can only select parameter files which were expressly created for the SnakeGrid software. These are encrypted files with the .dat extension.
(3) Coordinate system selection
This is where the source and destination coordinate systems are selected. Whatever selection is made, this will be applied to both the Single Point and Batch Conversion options.
Here you can select any combination of systems for transformation, except same coordinate system (like-to-like).
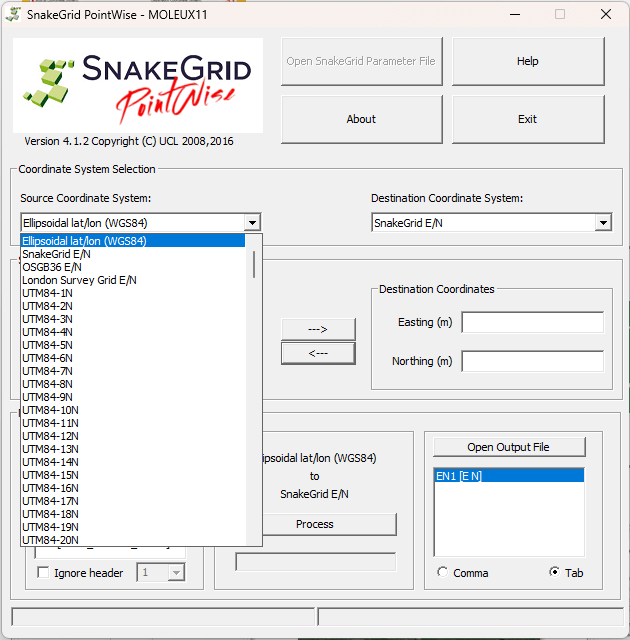
This area is disabled at the start of the program and requires a parameter file to be loaded. Although WGS84, OSGB36 and UTM coordinates do not require a SnakeGrid parameter file for the transformation between themselves, it is still necessary to define a parameter file before the software can be used.
(4) Single point conversion
If you want to convert a single point at a time this section can be used for quick transformations. Single point conversion can be done in either way (source to destination or viceversa), without requiring you to change the coordinate systems. Simply use the button with the correct arrow direction.
Note that angular values are always assumed to be in decimal degrees (up to 9 decimal places) and Cartesian coordinates (e.g. SnakeGrid) are always assumed to be in metres (up to 4 decimal places).
(5) Batch (multi-point) conversion
When converting more than one point, the batch conversion option should be used. This area allows the user to convert points listed in a text file and output the results to a separate text file.
Note that this area is disabled if no SnakeGrid parameter file was selected.
Pointwise will only transform Latitude and Longitude or Easting and Northing. However, typically points will be associated with other information such as Point ID, Height, Codes, Remarks etc. In order to allow for additional information to be transferred in the transformation procedure, the software allows for additional information to be placed in the input text file.
Below is an example of an input text file. This contains two points (P1 and P2) with latitude, longitude and ellipsoidal heights. You can either use comma or tab to delimit each bit of information about the point.
P1,53.51794444,-2.30817500,100
P2,53.51955556,-2.31013333,102
or
P1	53.51794444	-2.30817500	100
P2	53.51955556	-2.31013333	102
Input files for batch conversion support more formats for angular coordinates. Press the Help button to open the help file in order to see which formats you can use (Page 12 of the help file). To keep this tutorial simple, I will continue with the simple format listed above.
(6) Batch conversion input & output files
The bottom-most part of the program interface contains two boxes. These will list the file name and location of your input (left) and output (right) files. Once a batch conversion has been performed, these will be cleared.
Coordinate conversion procedure
Next we’ll explore how to convert coordinates in two different scenarios: single point conversion and batch conversion.
MOLEUX11 SnakeGrid
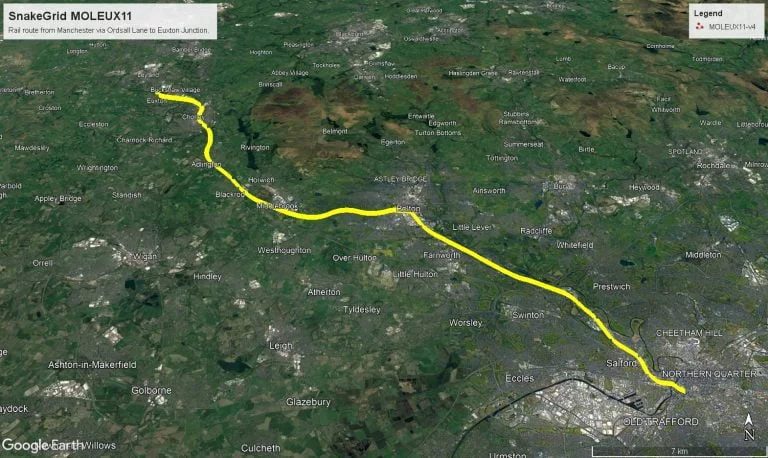
As mentioned in the Prerequisites part of this tutorial, I will be using the MOLEUX11 SnakeGrid. This grid covers the rail corridor between Manchester and Euxton Junction via Ordsall Lane. The Google Earth screenshot below shows the extents of the corridor for the MOLEUX11 grid.

For the conversion I chose two points along this route which I have named P1 and P2. These are listed in the text box below.
P1,53.51794444,-2.30817500,100
P2,53.51955556,-2.31013333,102
I have also included a screenshot with their location plotted in Google Earth.

Single point conversion
You should use this option whenever you want to convert a single point or a small amount of points. With this you can convert between the source and destination coordinate system in either direction.
To use the single point conversion option simply input the coordinate values in their respective boxes and press the arrow.
Doing a single point conversion is a simple 4 step procedure (once the parameter file has been loaded. Below are a few examples of conversion between different coordinate systems this way. All the examples are for point P1 (53.51794444, -2.308175).
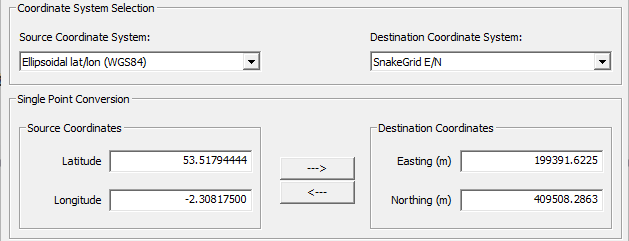
WGS84 (ellipsoidal) to SnakeGrid
Assuming you have already loaded the correct parameter file, to convert a point from WGS84 to SnakeGrid do the following:
- Select source coordinate system as Ellipsoidal lat/lon (WGS84).
- Select the destination coordinate system as SnakeGrid E/N.
- Input the Source coordinates (Latitude and Longitude) in the Source Coordinates box (Lat: 53.51794444, Long: -2.308175).
- Press the right arrow in the centre of the screen to perform the conversion. The output will be SnakeGrid coordinates (E: 199391.6225, N: 409508.2863).
SnakeGrid to WGS84 (ellipsoidal)
To convert from SnakeGrid back to ellipsoidal coordinates (single point procedure) do the following:
- Select source coordinate system as SnakeGrid E/N.
- Select the destination coordinate system as Ellipsoidal lat/lon (WGS84).
- Input the Source coordinates (easting & northing) in the Source Coordinates box (E: 199391.6225, N: 409508.2863).
- Press the left arrow in the centre of the screen to perform the conversion. The output will be WGS84 coordinates (Lat: 53.51794444, Long: -2.308175).
OSGB to SnakeGrid
The software can also be used as a OSGB to SnakeGrid converter. To do this, the same steps are used as in any of the previous examples. The only change is the source coordinate system.
- Select source coordinate system as OSGB36 E/N.
- Select the destination coordinate system as SnakeGrid E/N.
- Input the Source coordinates (easting & northing) in the Source Coordinates box (E: 379663.376, N: 402405.7175).
- Press the right arrow in the centre of the screen to perform the conversion. The output will be SnakeGrid coordinates (E: 199391.6225, N: 409508.2863).
SnakeGrid to OSGB
To use the software as a SnakeGrid to OS converter, simply switch over the source and destination coordinate system from the example above by following the same 4 steps:
- Select source coordinate system as SnakeGrid E/N.
- Select the destination coordinate system as OSGB36 E/N.
- Input the Source coordinates (easting & northing) in the Source Coordinates box (E: 199391.6225, N: 409508.2863).
- Press the right arrow in the centre of the screen to perform the conversion. The output will be OSGB36 coordinates (E: 379663.376, N: 402405.7175).
Non-SnakeGrid conversion
As mentioned in the beginning, you can also convert between coordinate systems unrelated to SnakeGrid. In this last example for the Single Point method I will convert WGS84 coordinates to OSGB36 coordinates. The same 4 steps apply:
- Select source coordinate system as Ellipsoidal lat/lon (WGS84).
- Select the destination coordinate system as OSGB36 E/N.
- Input the Source coordinates (Latitude and Longitude) in the Source Coordinates box (Lat: 53.51794444, Long: -2.308175).
- Press the right arrow in the centre of the screen to perform the conversion. The output will be OSGB36 coordinates (E: 379663.376, N: 402405.7175).
All the single points conversions can be done direct or inverse. So in order to convert from the Destination coordinate system to the Source coordinate system you simply press the left arrow in the middle, instead of the right arrow.
Multiple (batch) points conversion
Now let’s see how to do a batch conversion. For this example I will be using points P1 & P2 with their original coordinates being defined in the table below.
| Point | Latitude (DMS) | Longitude (DMS) | Ellipsoidal Height (m) |
| P1 | 53° 31′ 04.60″N | 2° 18′ 29.43″W | 100 |
| P2 | 53° 31′ 10.40″N | 2° 18′ 36.48″W | 102 |
I will be only looking at converting these coordinates from WGS84 ellipsoidal coordinates to MOLEUX11 SnakeGrid. But the procedure will be the same regardless of which source & destination coordinate systems you use.
Be aware that you can only do a direct conversion when using the batch conversion option (i.e. conversion is possible only from Source to Destination, not viceversa).
Assuming you have already loaded the correct parameter file, let’s get started with the procedure.
Step 1 – Coordinate system selection
The first step in the batch conversion is to select the source and destination coordinate systems. In this example my source coordinate system is Ellipsoidal lat/lon (WGS84) whilst my destination coordinate system is set to SnakeGrid E/N.
Step 2 – Select the input file
I have converted the Latitude and Longitude coordinates from DMS format into Decimal Degrees for simplicity. My input text file will look like this:
P1,53.51794444,-2.30817500,100
P2,53.51955556,-2.31013333,102
Copy these values into a new text file and save it on your computer with a relevant name such as Input (WGS84).txt.
In the SnakeGrid PointWise software press the Open Input File button and select the file you have just created.
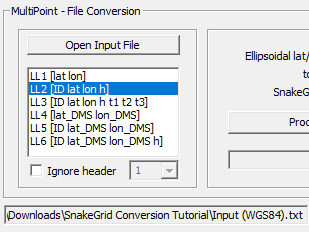
The input file contains point ID, Latitude, Longitude and Height. Therefore we will select LL2 [ID lat lon h] in the input format box.
My input file does not contain a header, so I will leave that option unchecked. If your input file has headers (ex a line or more describing the columns in the file), tick the Ignore Header box and select the number of lines to consider as header (typically 1).
Step 3 – Select the output file
The next step in the procedure is to select the output file. This is were our converted coordinates will be placed. Press on the Open Output File button, navigate to where you want to place it and give it a relevant name such as Output (SnakeGrid MOLEUX11).txt.
As I have mentioned previously, SnakeGrid PointWise only converts Latitude and Longitude or Easting & Northing. Therefore we need to specify for our output file that we want to copy over some additional information from the input file.
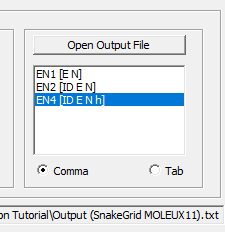
In my case I want to copy over the point ID and the height. From the output format list I will select the 3rd option EN4 [ID E N h]. I also want this file to be comma delimited so I will select the appropriate option (Comma) at the bottom of the output format list.
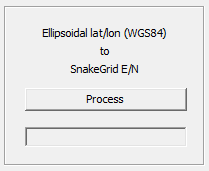
Step 4 – Final checks and processing
Lastly, before processing the data, we’ll have a quick look in the middle part of the batch conversion area to confirm that we are using the correct coordinate systems. Our source coordinate system should be listed at the top and the chosen output coordinate system should be listed below.
An additional check we can do is to look at the very bottom of the interface and confirm that our input and output files are listed correctly.

Once we are happy with our checks we can press the Process button to do the conversion. Because we only have a couple of points, the calculations won’t take that long. However, if you are converting a large number of points then the processing might take a while.
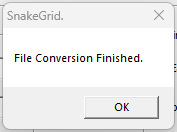
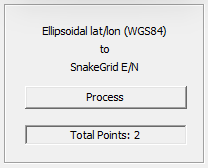
After the software has finalised the conversion, it will alert us of this and it will clear the output file selection (so we don’t accidentally rewrite it). The software also gives you the total number of points converted, which might be useful to make sure all our points were processed.
Results
The software will produce an output text file containing the results of the conversion. In my example, this text file contains the following:
SnakeGrid (c) UCL 2008,2016. Conversion: Ellipsoidal lat/lon (WGS84) to SnakeGrid E/N MOLEUX11
ID,E,N,HT
P1,199391.6225212500,409508.2862915926,100.0000000000
P2,199261.7231166493,409687.5998783865,102.0000000000
As you can see we have some additional information including the type of the SnakeGrid and a header representing the values in the file.
The resulting coordinates converted from WGS84 to SnakeGrid MOLEUX11 are listed in the table below:
| Point | Easting (m) | Northing (m) | Ellipsoidal Height (m) |
| P1 | 199391.6225 | 409508.2863 | 100 |
| P2 | 199261.7231 | 409687.5999 | 102 |
Assignment
As we all know, practice makes perfect. To get used to the software try to convert the original WGS84 coordinates into OSGB36 coordinates. The resulting coordinates should be like in the table below:
| Point | Easting (m) | Northing (m) | Ellipsoidal Height (m) |
| P1 | 379663.3760 | 402405.7175 | 100 |
| P2 | 379534.3036 | 402585.5262 | 102 |
You can also double check your results by converting the SnakeGrid MOLEUX11 coordinates into OSGB36 coordinates. The obtained values should be identical (or within a fraction of a millimetre).
Considerations
Whilst using the software there are a few things you should keep in mind in order to obtain correct values. Below is a list of what I think it’s important to remember when using SnakeGrid PointWise.
Heights
SnakeGrid is a two-dimensional coordinate system, therefore the PointWise software won’t transform heights even though the program allows for height input in batch conversions.
These are inherited from the source coordinate system. In this tutorial I have provided ellipsoidal heights, so all the hights listed throughout are to be considered ellipsoidal heights.
Height conversions should be done by other software, relevant to the survey area.
Ordnance Survey National Grid
When converting Ordnance Survey National Grid coordinates (OSGB36), the software will use the OSTN02 transformation parameters. Any OSGB coordinates you input or output in the software will be considered OSGB36 (OSTN02) coordinates.
In order to do the correct calculations we have two scenarios:
A. Source coordinates are OSGB36 (OSTN15) – In this case we need to convert them into OSGB36 (OSTN02) values in other software before using them in PointWise.
B. Destination coordinates are OSGB36 (OSTN15) – PointWise will only output OSGB36 (OSTN02) coordinates. Therefore we need to convert the values resulting from the software into OSGB36(OSTN15) coordinates via different route.
I hope this tutorial was easy to follow. If you have any questions or require any further clarification, feel free to write in the comment box below or send me a message via the contact form.
[…] If you are interested in a tutorial on how to convert coordinates to and from SnakeGrid, you can read the follow article about SnakeGrid Coordinate Conversion. […]
Great article. However, when converting a set of coordinates from SnakeGrid to WGS84 and SnakeGrid to OSGB36, I’m getting 2 different locations and I’m not sure which one is correct. Any advice?
Hi Craig, thank you for your comment.
Regarding your question, WGS84 and OSGB36 are two different coordinate systems. First one is Geodetic (Latitude and Longitude), the second one is Cartesian (Eastings and Northings). What are the differences you are getting? Can you explain your workflow step by step?
Do you convert WGS84 to OSGB36 (or vice-versa) and get different values? If so, what transformation software are you using to convert between WGS84 and OSGB36? Are you doing it in PointWise or another software such as Grid InQuest?
Please note that OSGB36 coordinates created by SnakeGrid PointWise are calculated based on the OSTN02 transformations (not the latest OSTN15 one).
Hi Florentin,
Thanks for your reply. I actually submitted a query on the SnakeGrid website and got a reply from Jonathan Iliffe, who was very helpful and gave a similar response to yourself.
Basically, I have a SnakeGrid parameter file and a set of as-built SnakeGrid coordinates from site that I’ve converted using SnakeGrid PointWise. As a quick check I plotted both the converted WGS84 and OSGB36 coordinates on https://gridreferencefinder.com and this is where I noted the difference in positions that led to some confusion on my part. I appreciate this is a fairly rudimentary way of doing things, but as mentioned it was only a quick check. However, I’m and engineer, not a geodesist, so my understanding of coordinate transformations is somewhat limited!
Thanks,
Craig
Hi Craig,
I’m happy you sorted it out. Whilst Grid Reference Finder is a great tool for quick conversions, it’s not ideal for precise coordinate work. From what I can tell it uses a Helmert 7 Parameter Transformation which would yield coordinates with approximately 3 metre precision. Best way of converting between ETRS89 (seame for WGS84 for all intents and purposes) and OSGB36 (TN15/GM15) is by using Ordnance Surveys Grid InQuest 2 software.
Let me know if you require any more help. Feel free to also use the contact form for email communication.
All the best,
Florentin